|
REPLACING THE DRIVE BELT ON A STANDARD
PULL CORD VOICEBOX
DIY INSTRUCTIONS
|
| These are often fitted to Mattel & Rosebud Dolls from the 1960's onwards.
We've also seen them in many soft toys, including Wombles, Rupert Bear and
Honey Monster. The repair instructions below show how we secured
various parts during the removal and reassembly of the box - you may find
your own methods for doing this but the repair process remains the same. Finding the correct drive belt proved impossible until we found a US company who sells
tools, parts and instruction books for many types of pull-cord voice boxes -
the link was http://id.mind.net/~truwe/tina/hard.html
however this seems to be no longer active. However we found
references to the very helpful chap running the business Talky Tina Press
(Ben Truwe) on https://www.bizapedia.com/or/talky-tina-press.html
that provides his business address (Ben Truwe, 607 S Holly St, Medford, OR
97501) with a phone book listing of (541) 773-8369. He may or
may not be still able to help (or provide the suppliers he used to use).
We have heard from someone who successfully used these instructions that they found an O Ring seal that fitted and
worked - so you can be creative. However finding a drive belt that
works (other than ordering from the above website) is difficult and you
can spend a lot of time assembling and disassembling the box while you try
various possibilities instead of buying the correct belt.
|
| |
 |
|
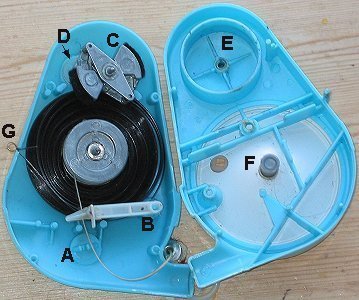
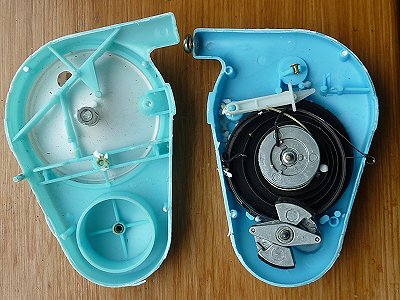
Key:-
A - Pull-cord guide
B - Record needle arm
C - Speed governor
D - Small pulley
E - Plastic circle (for speed governor)
F - Spring loaded speaker pad
G - Main spring securing loop |
Removing the Box
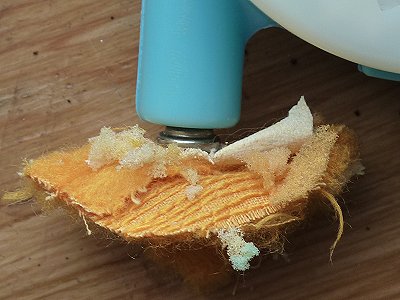
If your box is inside a soft toy then you will need to unpick a seam to extract the box.
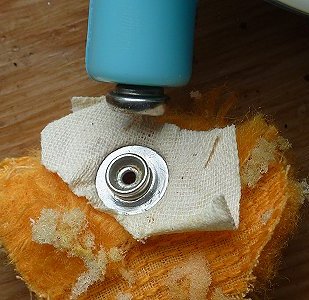
The pull cord usually emerges through a metal hole on the toy - this is actually a two part "pop" device with a hole through the middle for the string.
One part stays in the voice box and the other sits on the outside of the fabric and they "snap" together and you can USUALLY prise them apart to release the box from the fabric.
We have found boxes where we could NOT prise these apart so if you find that then don't be too
aggressive - you'll have to work with the box attached to the fabric. Sometimes the snap fitting has pulled away from the fabric anyway, all you can do when reinserting
your (hopefully fixed) box is to gather the fabric around the centre of the snap fitting.
Securing the string
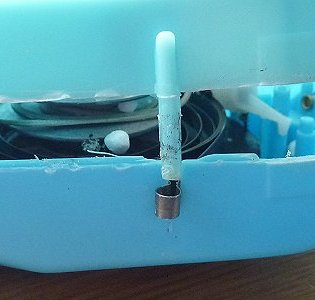
If the string is still present then pull it out about half way and you need to hold it out and secure it to the back of the box (NOT the side with the speaker grill).
We have used small plastic locking forceps to clamp the spring and then taped the forceps to the back of the box.
Without such a tool you may be able to wind the string around a piece of stiff card and then tape it securely to the back of the box - you do NOT want this flying back into the box when you
separate the two halves.
Opening the Box
These are usually glued together and so need cracking along the glued seam.
This is fiddly but not to be rushed - cracking the box anywhere but along the seam could be disastrous - so take your time.
This can take a minute or hours - it all depends on how well the box was glued together in the factory.
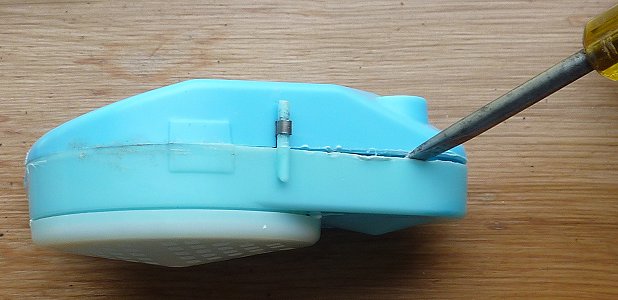 |
I usually take a sharp craft knife and gently cut into the seam until I can just get inside.
Then I JUST insert the edge of a paint scraper or screwdriver into the seam and twist it slowly to begin the cracking process.
If this is not easy then don't force it, try and score through more of the seam with a sharp craft knife.
Don't push either the craft knife or the paint scraper/screwdriver further into the case seam than you need to or you'll damage internal parts - you just want to get into the edge of the seam and encourage a crack along the seam.
Once the crack starts along the seam, work slowly along the seam twisting the paint scraper slightly to push the crack forward - slow and steady is best to avoid cracking the plastic anywhere BUT the seam.
Be very careful around the stem area where the string exits from the "snap" fitting - this area is particularly vulnerable.
Once the seam has cracked all the way around, place the speaker grill upwards and carefully part the two halves of the box by lifting the speaker grill half - peek inside as you do this and try to leave the internal parts
down on the side of the box opposite the speaker grill (use a finger or thin tool - be careful not to scratch the record).
There is a pin on the top half of the box that fits through the loop of the main spring that sticks out of the body (the little circular loop at the 9pm
clock-face position, G in the top picture) - make sure this pin does not pull the spring loop upwards as you
separate the two halves - keep the little loop in its groove on the bottom half of the box. You should now see the inside of the box.
 |
|
 |
Removing parts
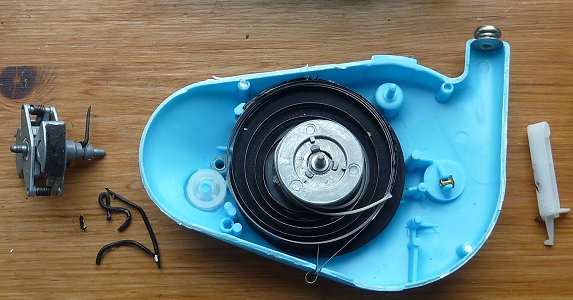
You can now lift out the little record needle arm (B in the first picture) that should be sitting on top of the pull cord
(if it is still there) - make sure the needle is clean with no fluff on it.
Note that the pull cord should have been sitting inside the little ferule
in the little groove
(A in the first picture), don't worry if it pulls out, but it must be back in there before you reassemble the box.
 |
|
You can also lift out the speed governor (C in the first picture).
If there is an old loose belt around it then just cut this old belt.
Usually however the belt disintegrates into a sticky mess.
|
Stabilise the spring
 |
|
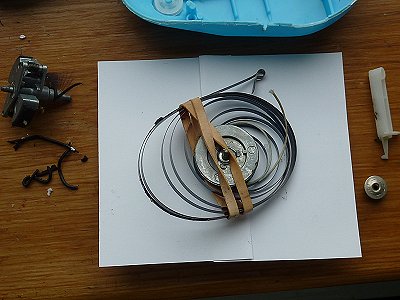
You do NOT want the spring to leave the pulley,
it can unwind violently and spring across the room and it can be difficult
to get the end of it to stay back into its groove on the pulley - it is
only held in there by the tight loops of spring on top of the end.
So, hold it securely as you remove the record and pulley and put a
stout rubber band around the pulley and spring, making sure the band is
strong enough to stop the pulley rotating and unwinding the spring.
Now you can slide a couple of pieces of paper (each with a semi-circle cut
out of the edge to fit around the spool) under the spring and above the
record surface (I usually hold them together at the join with little
pieces of sticky tape). You can now clean the record and the spring
and pulley of any dirt and rubber belt debris without the spring
scratching the record surface. |
Cleaning out any old belt debris
You now need to clean out any old pieces of belt and any gooey mess it may have left behind.
We've seen instructions to use rubbing alcohol to clean up any gooey mess - we used to use a "sticky stuff remover" but if you have neither then a cotton bud dipped in some washing up liquid may also be used (but not quite as effective).
You need to clean up any mess in the box, around the groove just under the record (where the new belt will fit), around the speed governor pulley and also the other little pulley groove (D in the
first picture).
Any of this goo that remains can cause the new belt to slip, so everything must be clean and dry - so don't get things too wet and make sure you dry off everything with tissue when you've finished cleaning.
 |
|
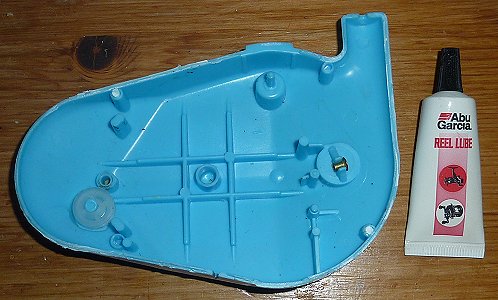
You now need to apply a tiny blob of lubricant
to the left (speed governor) bearing hole and the centre (record pulley)
bearing hole.
The best thing to use (that will not attack the
plastic) is use the lubricating grease used on fishing reels - easily
obtained in any fishing shop.
|
Checking the speed governor
 |
|
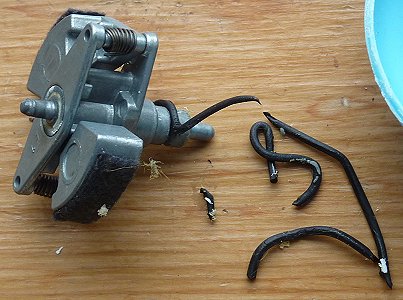
. Here the speed governor is shown with
the gooey remains of the old belt.
The speed governor is rotated as the record plays, and it has two metal arms that are flung outwards by the speed of
rotation. On the end of each of these two arms is a little friction pad, and since the governor
runs inside the plastic circle on the top half of the case (E in the first picture) they rub the sides of this circle and the friction keeps the speed to an acceptable level.
So, the circle in the top half of the case must be clean and dry as well as the
governor top and bottom pins that fit into plastic bearing holes in the
case. The two little pads should be clean and dry and stuck in place on the little arms.
Sometimes these pads can be detached and can be stuck back on with a thin
layer of soft glue. |
Replacing the string (if necessary)
 |
|
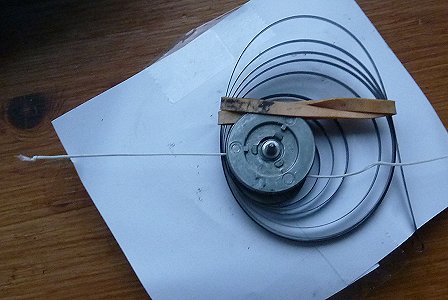
Notice the old cord, a knot on the left,
through a slot in the pulley groove and exiting from the right.
Take
some new cord. It is very difficult to use normal string (which is round),
the correct cord is flat and slips through the slot easily. Take a
new piece (about 80cm long) feed it through the groove and tie one little
knot on the end at the left as above - then wind the string on the right
around the pulley in an anti-clockwise direction.
|
Replacing the drive belt
 |
|
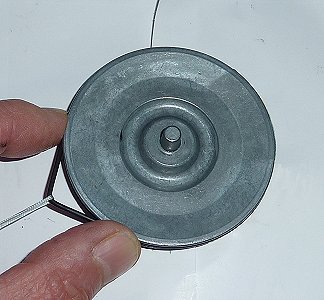
You now need to replace the new belt in the
(now cleaned and dry) record groove.
Gently turn over the record and
spring assembly (with the two paper "protectors" still
attached). Before you slip on the new belt, feed through it a piece
of cord so that when the band snaps into the groove you can pull it out
slightly with the cord (as shown) when you need to feed it around the
speed governor pulley.
|
Replacing the record assembly into the case bottom
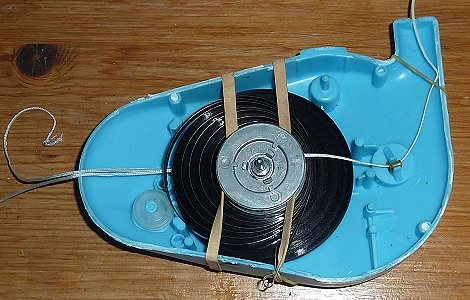 |
|
Once the belt is in place (with its trapped piece of cord), remove the rubber
band holding the spring (don't let it unwind) and remove the paper
protection between the spring and record. Gently locate the bottom pin of the record assembly back into its hole on the bottom of the case.
Carefully locate the looped end of the spring into the slot in the side of
the case. To hold it there (in case it jumps out) you can put a thin
rubber band over the loop, under the case and loop it around the box exit
arm. To hold the spring in place, you can put your stout rubber band
around one side of the pulley, stretch under the case and around the other
side of the pulley - you can now relax! |
Replacing the speed governor into the case bottom
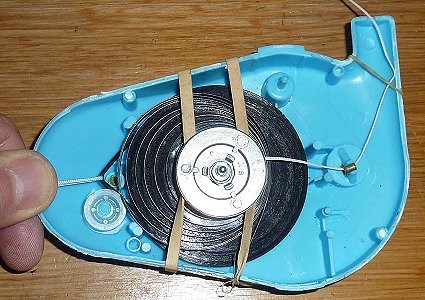 |
|
You now need to refit the speed governor
back into the hole but the drive belt needs to go around the groove at the
bottom of the governor.
Gently pull out the drive belt across the hole where the governor fits by pulling on the two ends of the piece of cord you trapped between the belt and the record groove - slip the governor pin into its hole and ease the cord back so the belt fits into the governor groove. |
| |
|
|
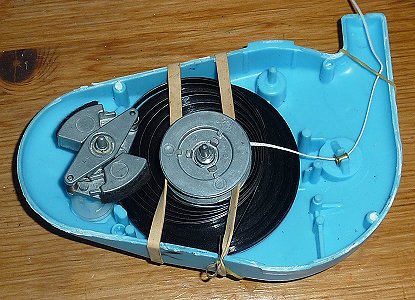 |
|
You can now remove the small piece of "pulling" cord. |
| |
|
|
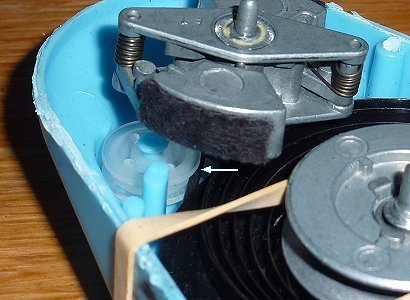 |
|
The belt does NOT go round the other small pulley (D in the
top picture) - this is there just to keep the drive belt
in the governor groove. |
Replacing the exit hole pop rivet into the case bottom
 |
|
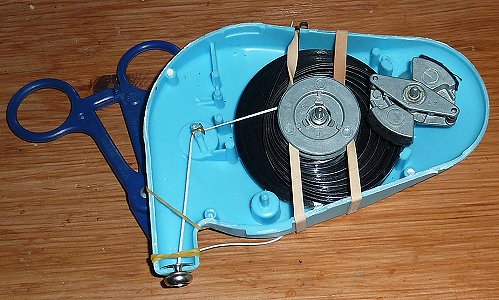
Place the exit-hole pop rivet into the end
of the exit arm of the case, the thin circle of metal inside and the
bulbous end with the pop on the outside. Feed the cord though the
pop rivet part making sure it has also been fed through the little ferule
sitting between the two little plastic arms.
Before releasing the rubber band over the record pulley you must hold
the pulley cord firmly. This is best done with a small pair of
plastic locking forceps clamped onto the cord. The forceps can be
held in place against the bottom of the case with a rubber band around the
forceps and the case exit arm. |
| |
|
|
 |
|
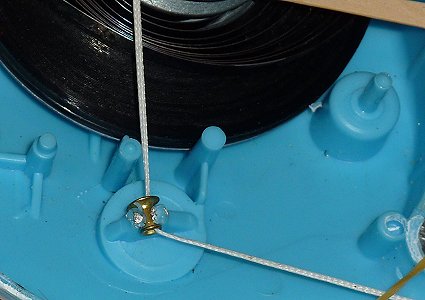
You may find that the little ferrule is not
held firmly inside the two little plastic arms - some are and some are
not. When you release the record pulley rubber band the spring will
pull on the cord and may lift out this ferrule.
If it is not firmly held in place than a quick way of securing it is to
carefully melt the little arms inwards with a hot soldering iron. A hot
glue gun could also be used but you must NOT (obviously) get anything on
the cord. |
| |
|
|
 |
|
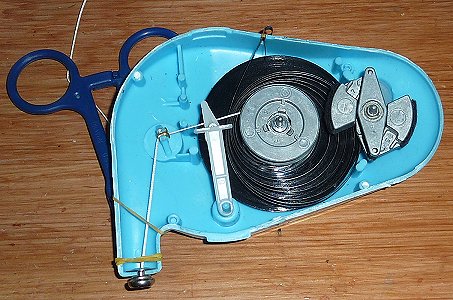
Now make sure that the small plastic arm and
record needle is clean and dry and free from any fluff and place it on the
plastic pin next to the record. The arm sits on top of the cord, make sure
the actual needle is sitting above the record surface. |
Replacing the top
 |
|
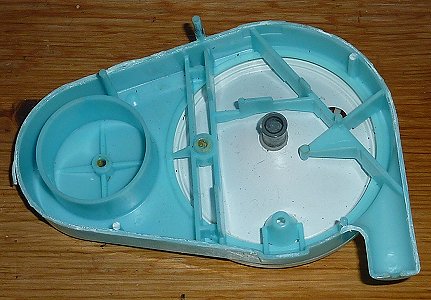
Before replacing the top you need to ensure
this is clean with no gooey residue from the old belt. The circular
cylinder into which the speed governor fits must be clean and dry as well
as the smooth sprung plastic pad on the back of the speaker cone (that
sits on top of the record needle)..
Also clean out the two bearing points and apply a tiny blob of the
fishing reel lubricant. |
| |
|
|
 |
|
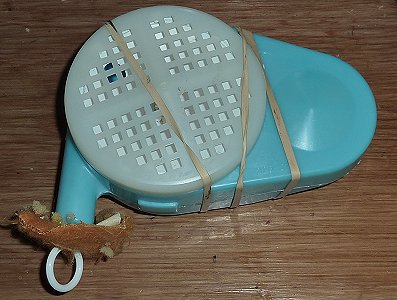
Place the top back on top of the box making sure that: the plastic side pin on
the outside fits into the spring loop, AND the spring loaded pad on the back of the speaker (F in the
top picture) sits on the cross-piece on the record needle arm AND the governor sits inside the plastic circle (E in the
top picture)
AND the pin on the top of the record assembly fits into the hole on the top half.
Note that you will not be able to yet FULLY close the box because of the
rubber band holding the small looped end of the spring poking through the side of the bottom box
(G in the top picture) AND the rubber band holding the plastic forceps (holding
the cord) to the base of the case. You can cut these bands and
carefully remove them before finally closing the box. |
Testing the box
You now need to hold the box together while you test it. One way is to wrap around it the stout rubber band you used to hold down the record assembly - make sure it is wrapped around the box tightly so the two halves are held tightly together.
You can now move the forceps holding the pull cord further down the string (as
an end-stop to stop it all winding back into the box) and let the free cord gently return into the box. Gently pull out the
cord (pull the free end of cord, NOT the plastic forceps) and make sure the box operates normally.
If the speed of the record is too slow then it probably means you need to wind
the spring up a little bit. To do this you must hold the box with the
speaker upwards, pull the cord out from the box by a small amount (2 or 3
inches) and then hold the cord firmly AND the small spring loop exiting the
bottom case and carefully remove the top of the box. Keep a close eye on
the record assembly inside and ensure it does NOT lift out of the bottom of the
case. Tighten the spring by holding the record pulley firmly (so that you
can release the cord from your grip) and wind the slack cord around the record
pulley in an anti-clockwise direction. Replace the top of the box as above
and then re-test.
If you find that the box works but there is now too much string (such that
after the phrase has been "spoken" there is still spare cord which
continues into the box, usually accompanied by noise as the record needle runs
around the final record groove) then move the plastic locking forceps closer
along the cord towards the box and repeat the testing process.
You have it correct when the cord can be fully pulled out until it stops
(either by the spring fully tightening OR the cord reaching the end inside the
box), the box then operates normally and the cord stops (because of the plastic
forceps clamp) just after the phrase completes.
Now, make a small mark on the cord where you have the forceps clamped.
Pull the cord out about 6 or 8 inches and move the forceps up to the box to hold
the cord. You now need to tie on the plastic pull ring onto the cord.
 |
|
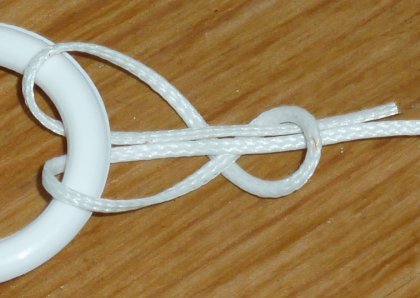
We've seen many rings tied on with the knot
shown, not sure what it is called but it seems very secure when pulled
tight.
However you do it, it must NOT untie - to make sure you can always add
a small drop of super-glue to the knot - but give the box several more
tests to make sure it is OK before you do this.
If you use the method shown then cut the free end off fairly short
before applying the drop of super-glue. |
Gluing back the box
Once you are sure the box is working normally then you need to hold the two
halves together. We've seen instructions that say you should apply a couple of drops (sparingly) of impact plastic glue on the seam on either side of the speaker grill and then wrap stretched electrician's tape tightly around the rest of the box,
including the stem where the pull
cord exits.
We don't like that idea because electrician's tape tends to stretch, get sticky and messy and we think may not be permanent so we prefer to glue the
seam together SPARINGLY (you do not want glue inside the box) by applying a
small amount of epoxy resin at about a dozen spots all around the box. The choice is yours, it depends whether you think you'll need to take the box apart again soon.
We usually finish off the gluing (making sure the box still works OK when the
glue is dry) by wrapping
microporous surgical tape (that doesn't stretch or get messy) around the box
along the seam. That is a personal preference to just neaten up the seam.
WELL DONE
Top

